前两篇我们整合了SpringBoot+Shiro+JWT+Redis实现了登录认证,接口权限控制,接下来将要实现前端 Vue 的动态路由控制。
1. 前端权限控制思路(Vue)
前端的权限控制,不同的权限对应着不同的路由,同时菜单也需根据不同的权限,异步生成。
先回顾下整体流程: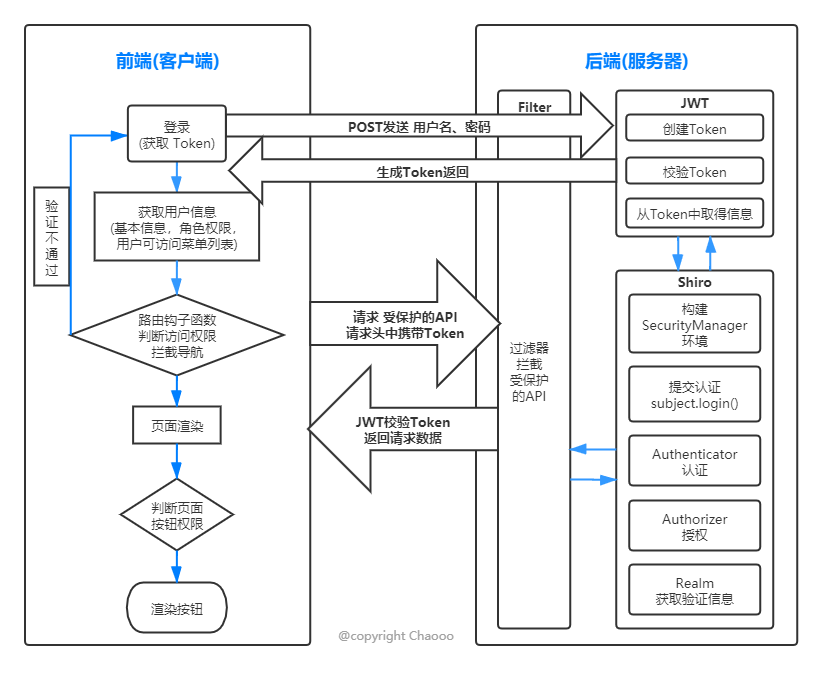
- 登录: 提交账号和密码到服务端签发
token,拿到token之后存入浏览器,再携带token(一般放在请求头中)再去获取用户的详细信息(包括用户权限等信息)。 - 权限验证:通过用户权限信息 构建 对应权限的路由,通过
router.addRoutes动态挂载这些路由。
接下来将基于 Vue 开源后台模板vue-admin-template来演示具体流程,这里只演示重要代码,完整项目移步文章末尾获取源码。
2. 登录
- 先准备基础的静态路由(
src/router/index.js)
1 | export const constantRoutes = [ |
- 登录页面(src/views/login/index.vue)
click事件触发登录操作
1 | this.$store.dispatch('user/login', this.loginForm).then(() => { |
- 登录逻辑(src/store/modules/user.js)
action:
1 | const actions = { |
/login与/getInfo接口与返回的数据
1 | POST (localhost:8282/login) |
- 获取用户信息(src/permission.js)
- 用户登录成功之后,我们会在全局钩子
router.beforeEach中拦截路由,判断是否已获得token,在获得token之后我们就要去获取用户的基本信息 并且根据用户角色动态挂载路由。
- 用户登录成功之后,我们会在全局钩子
1 | const whiteList = ['/login'] // 白名单 |
3. 动态挂载路由
主要思路,前端会有一份包含所有路由的路由表。创建Vue实例时会先挂载登录等公共路由;当用户登录之后,通过getInfo(token)获取用户的角色(roles),动态根据用户的roles算出其对应有权限的路由,再通过router.addRoutes动态挂载路由;使用vuex管理路由表,根据vuex中可访问的路由渲染菜单。但这些控制都只是页面级的,后端接口也需要做权限验证。
- 改造一下路由表,添加异步路由列表,将角色添加到元数据
meta中:
1 | // 动态路由 |
- 根据前面获取用户信息的代码可发现,通过
store.dispatch('permission/generateRoutes',roles)来获得有权限的路由,新建src/store/modules/permission.js如下:
1 | import { asyncRoutes, constantRoutes } from '@/router' |
4. axios 拦截器
通过request拦截器在每个请求头里面塞入token,好让后端对请求进行权限验证;代码位置:src/utils/request.js。
1 | import axios from 'axios' |
5. 指令权限
可以使用全局权限判断函数,实现按钮级别的权限判断。
1 | <template> |
src/utils/permission.js:
1 | import store from '@/store' |
6. 效果演示:
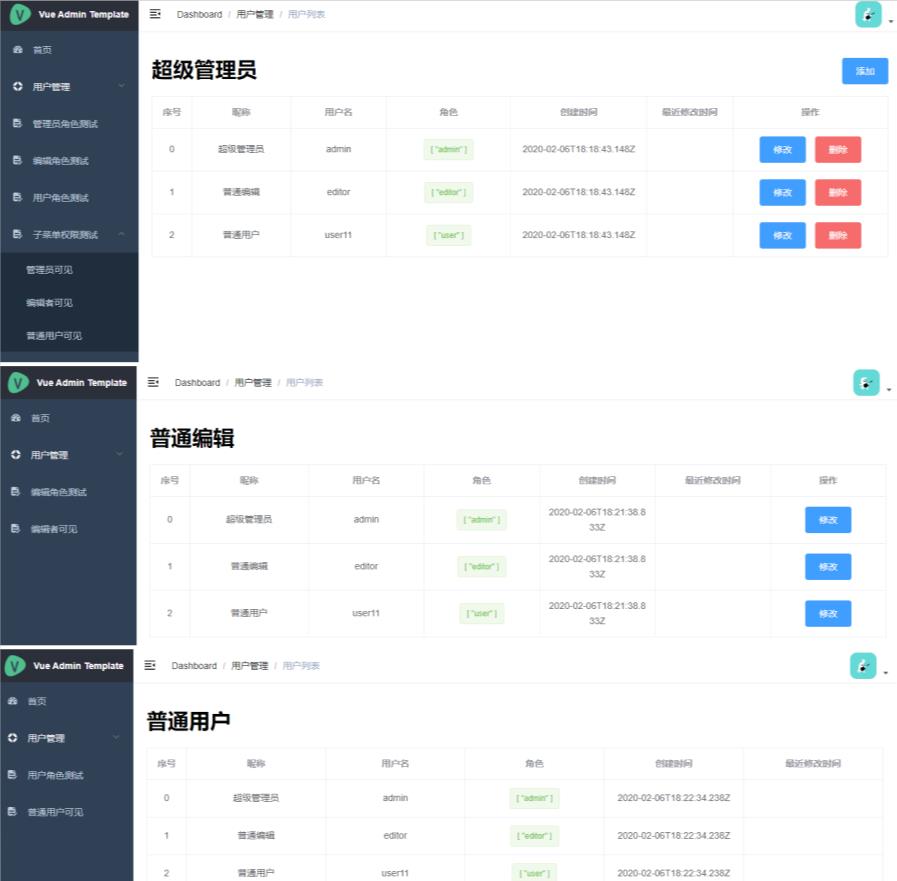
注:搭建到这里的代码在
github源码tag的V3.0中。
源码地址: https://github.com/chaooo/springboot-vue-shiro.git
原文链接: http://chaooo.github.io/2020/02/07/authenticate-shiro-vue.html
版权声明: 转载请注明出处.